Showing posts with label tool. Show all posts
Showing posts with label tool. Show all posts
May 17, 2011
Fix: Volume Shadow Copy Errors When Running Backup Software
Symptoms:
Backup software uses a Microsoft service called Volume Shadow copy Service to enable disk images to be created and files to be backed up when in use.
When VSS fails it can sometimes mean that you are unable to create a disk image or backup open files.
The Bakup software will usually gives errors accessing the file or the VSS service.
The Application or System Event logs will list some error events related to VSS:
Events 12301:
Volume Shadow Copy Service error: Writer MSDEWriter did not respond to a GatherWriterStatus call.Event 12302:
Volume Shadow Copy Service error: An internal inconsistency was detected in trying to contact shadow copy service writers. Please check to see that the Event Service and Volume Shadow Copy Service are operating properly.
Solution:
1. Make sure you run all Windows updates for your system (especially for Server 2003 there are some updates packages for VSS)
2. Download and run the following fix-tools according to your system type 32/64 bit:
VSSfix for 32bit
VSSfix for 64bit
* the tools are provided by Macrium Reflect backup software company, as a fix for their customers. but it can be used by everyone because it fixes a failed system component of Windows.
Read more at source
Apr 6, 2011
Tool: Free Instant Translation Tool Tirgumit (Replacement for Paid Babylon)
תוכנת תירגומית יצאה בגירסה חדשה (4.0) ומומלצת להורדה חינם!
תכונות:
&תרגום מיידי בלחיצה על המילה (OCR המזהה את המילה לתרגום, בדומה לבבילון)
&תרגום מלא ל- 17 שפות בעזרת שירות התרגום של גוגל
&תרגום מסמכי PDF
&מילים נרדפות
&הגיית טקסטים
&תיקון שגיאות כתיב
&ועוד...
ניתן לקבוע את מקשי ההפעלה או הלחצנים בעכבר להפעלה מהירה.

Apr 4, 2011
Fix: Unable to open .PPS attachments directly from Outlook Express?
When using Powerpoint Viewer you might get errors trying to open a presentation file sent as attachment when using Outlook Express.
To fix it, use this tool
Using the PPSFix utility
Download PPSFix.zip (~12 KB). Unzip the file and run the utility. Select the file types that you want to fix, and then click Fix. Note that you need to login as administrator in order to use this utility.
Manual fix:
Click Start, Run and type CONTROL FOLDERS
In the Folder Options applet that opens, select the File Types tab
Scroll down and locate the following entry:
PPS (Microsoft PowerPoint Slide Show)
Click Advanced
Click the New button
Type Open in the the Action: text box
In the Application used to perform action: field, type the following exactly:
For PowerPoint Viewer 2003:
"C:\Program Files\Microsoft Office\PowerPoint Viewer\pptview.exe" "%1"
For PowerPoint Viewer 2007:
"C:\Program Files\Microsoft Office\Office12\pptview.exe" "%1"
Uncheck the Use DDE box
Click OK, OK
Close the Folder Options dialog
For PPT files
If the problem is seen for .PPT files, then make the above changes to the following file type:
PPT (Microsoft PowerPoint Presentation)
Credit: http://windowsxp.mvps.org/ppsopen.htm
Feb 13, 2011
Error opening attachments in Outlook saying "Access Denied" & Check Permissions

"אין אפשרות ליצור את הקובץ: filename.tif. לחץ באמצעות לחצן העכבר הימני על התיקייה שבה ברצונך ליצור את הקובץ ולאחר מכן לחץ על 'מאפיינים' בתפריט הקיצור כדי לבדוק את ההרשאות שלך עבור התיקיה."
When opening an attachment directly from within Outlook you could get an error message saying that it can’t create the file and to that you need check the permissions on the folder you want to save it in. In most cases the permissions on the folder isn’t the issue but the fact that the folder is "full". When you open an attachment directly from within Outlook it will first save a copy to a subfolder of the Temporary Internet Files folder. Cleaning out the folder will solve the issue.The special folder where outlook temporarily saves the file for opening is listed in the registry.
Locate the folder path:
| Outlook 97 | HKEY_CURRENT_USER\Software\Microsoft\Office\8.0\Outlook\Security |
| Outlook 98 | HKEY_CURRENT_USER\Software\Microsoft\Office\8.5\Outlook\Security |
| Outlook 2000 | HKEY_CURRENT_USER\Software\Microsoft\Office\9.0\Outlook\Security |
| Outlook 2002/XP | HKEY_CURRENT_USER\Software\Microsoft\Office\10.0\Outlook\Security |
| Outlook 2003 | HKEY_CURRENT_USER\Software\Microsoft\Office\11.0\Outlook\Security |
| Outlook 2007 | HKEY_CURRENT_USER\Software\Microsoft\Office\12.0\Outlook\Security |
Go to the folder:
- Open the OutlookSecureTempFolder registry key from the location provided in Step 1.
- Copy the path from the key.
- Open Explorer
- Paste the address in the Address Bar and press Enter
- Empty the folder.
To make things easier you can use this cool tool from HowTo-Outlook.com.
The tool allows you to:
Dec 13, 2010
Tool: Script For Restarting Microsoft Outlook
Below is a batch script for safely restarting Microsoft Outlook.
This is useful for cases where an Outlook process gets stuck and trying to launch Outlook opens the application but prevent Oulook from receiving or sending mails.
Use Notepad to create a new text file and save it with the extension .BAT to make it as a batch file.
Note that the path for Outlook in this example is for Outlook 2010 32bit running on a 64bit Windows.
If you're using a different Oulook or Windows version, change the path according to your system.
The Script commands:
@echo off
taskkill /im outlook.exe /t
echo.
echo.
echo **************************************
echo Please Wait While Restarting Oulook...
echo **************************************
echo.
echo.
sleep 3
taskkill /f /im outlook.exe /t
sleep 3
cls
echo ************************************************************
echo This Window Can Be Safely Closed by Pressing the X Button...
echo ************************************************************
call "C:\Program Files (x86)\Microsoft Office\Office14\OUTLOOK.EXE" /recycle
exit
Nov 15, 2010
Fix: Reset Permissions on File System & Registry in Win7/Vista
Use the following tool to reset the file-system and registry permissions back to default. it is very useful after some malware or virus attack that made a mess in your Windows.
Download Here.
Read more over here.
more about it in Hebrew:
Download Here.
Read more over here.
more about it in Hebrew:
איפוס הרשאות לקבצים וערכי רג'יסטרי
מצרף אוסף כלים המיועדים לאפס את הרשאות המערכת על קבצים וערכי רג'יסטרי.
כידוע במערכות הפעלה חדישות ישנן הרשאות (או ACL = Access Control List) שקיימות על כל אובייקט במסד הנתונים של המערכת.
ניהול וגישה להרשאות הללו נעשה בעזרת לשונית אבטחה (Security) במאפיינים.
במערכת קבצים מסוג NTFS יש הרשאות לקבצים, תיקיות וכוננים שלמים. ברג'יסטרי יש הרשאות לערכים ומפתחות. בשרתים יש הרשאות על אובייקטים כמו חשבון משתמש, חשבון מחשב או קבוצת ניהול (OU).
במקרה של וירוסים ושלל זבלי-רשת הערכים הללו משובשים. זה גורם לשלל תופעות משונות כמו מניעת גישה לתיקיות/כוננים מסויימים. תהליכים שנכשלים בעלייה ומשאירים שגיאות רבות ביומנים האירועים וגם
המון תקלות הקשורות בהתקנות של תוכנות. לעיתים השגיאות בהתקנה לא קשורות לתקלה עצמה. למשל, שיבוש הרשאות על ערכים ברג'יסטרי שמונעים ממנגנון ההתקנה לכתוב לאזור מסויים. תוכנית ההתקנה תכשל
ותזרוק הודעות משונות ולא קשורות. הסרה מלאה והתקנה מחדש לא יסייעו ותרגישו שעשיתם הכל אבל עדיין תקועים... ייתכן מאד שיש בעיית הרשאות- בייחוד אם המחשב נגוע או היה נגוע במזיקים.
אוסף הכלים הללו מאפס את הגדרות ההרשאות לברירת המחדל כך שלמנהלים ולחשבון ה- SYSTEM (שבעזרתו המערכת מנהלת את עצמה) יהיה הרשאות מלאות.
להפעלה נוחה שיניתי את שמות הקבצים עם תחילית ממוספרת כדי לזכור את סדר ההפעלה:
1. כלי שייצור נקודת שחזור ליתר ביטחון
2. כלי עזר שיותקן ויסייע בתהליך איפוס ההרשאות.
3. סקריפט שיאפס הרשאות בכל קבצי המערכת והרג'יסטרי.
4. סקריפט שיאפס הגדרות אבטחה כלליות במערכת ההפעלה בחזרה להגדרות היצרן כמו לאחר התקנה מחדש.
הכלים הללו מתאימים לשימוש לחלונות ויסטה ו-7
מומלץ בחום לשימוש. מי שמעוניין בחומר קריאה נוסף ניתן לגלוש לכאן.
בהצלחה!
ירון מאור
Nov 5, 2010
Tool: How to Remove Office 2003/2007/2010 If It's Impossible Using Control Panel's Add/Remove Applet
In cases where Microsoft Office suite is missing from the Add/Remove Application list, or it is impossible to remove it using the normal uninstalling method. You now have an easy way to remove Office using "Fix It" tools from Microsoft: Link
To Uninstall Office 2003: Download Tool
To Uninstall Office 2007: Download Tool
To Uninstall Office 2010: Download Tool

To Uninstall Office 2003: Download Tool
To Uninstall Office 2007: Download Tool
To Uninstall Office 2010: Download Tool
May 19, 2010
Tool: How to Recover Routers Passwords & Settings
A new tool from the best freeware site Nirsoft.net was just published that allows you to recover valuable information from a saved backup configuration files of network routers.
Description
Most modern routers allow you to backup the configuration of the router into a file, and then restore the configuration from the file when it's needed.
The backup file of the router usually contains important data like your ISP user name/password, the login password of the router, and wireless network keys.
If you lost one of these password/keys, but you still have a backup file of your router configuration, RouterPassView might help you to recover your lost password from your router file.
For now, RouterPassView supports a limited number of router models, and I'll gradually add support for more routers in future versions. Also, be aware that even if your router is not in the list, you can still try to open your router backup file with RouterPassView, because some routers are sold with different brand name, but they still use the same software/chipset of other routers.Here's the list:

Description
Most modern routers allow you to backup the configuration of the router into a file, and then restore the configuration from the file when it's needed.
The backup file of the router usually contains important data like your ISP user name/password, the login password of the router, and wireless network keys.
If you lost one of these password/keys, but you still have a backup file of your router configuration, RouterPassView might help you to recover your lost password from your router file.
This utility works on any version of Windows, starting from Windows 2000 and up to Windows
Supported Routers
Due to large amount of router models available in the market, it's impossible to support all of them.For now, RouterPassView supports a limited number of router models, and I'll gradually add support for more routers in future versions. Also, be aware that even if your router is not in the list, you can still try to open your router backup file with RouterPassView, because some routers are sold with different brand name, but they still use the same software/chipset of other routers.Here's the list:
- Linksys WRT54GL, and possibly similar models.
- Edimax BR6204WG, and possibly similar models.
- Siemens ADSL SL2-141, and possibly similar models.
- Dynalink RTA1025W, and possibly similar models.
- NETGEAR WGT624, and possibly similar models.
- ASUS WL-520g, and possibly similar models.
Test Results...
I've tested it on a file saved on an Edimax BR6204wg and this is the result:

The utility easily recovered the login password, Wireless encryption type and secret key, and also my ISP VPN and DynDNS settings (which I've erased from the screenshot..).
Cool indeed!!
Download from here.
More information here.
Mar 27, 2010
Fix: Windows XP/Vista Connection Limit (Event id 4226)
After years of struggle with Tcp/Ip patches, Microsoft finally remove the half-open connection limit.
Since Windows XP SP2 Microsoft limited the maximum half-open connections to 10 only. this limitation have caused many file-sharing applications to slow-down their download rate, and Event-id 4226 has flooded the system event log.
In Vista SP2 this limitation is finally gone! you can read more about it in this KB969710 Article
Windows 7 is no longer limited by default.
How to Remove TCP/IP Limitation in WinXP SP2-SP3 and Vista RTM-SP1
Those of you who still works on older versions of Windows (Vista/SP1, XP-SP2/SP3) can use
the following recommended utilities. These tools are also referred as:
Event ID 4226 Patcher, EvID4226 fix, TCP/IP Patch, TCP Half Open Connection Limit Patch
1. Lvllord Event ID 4226 Patcher (4226 fix)
2. TCP-Z Patcher
3. Universal Tcpip.sys Patch
4. Half-open limit fix (patch) for Windows
Please note the instructions on each utility. Some of them includes different versions for 32bit and 64bit Operating system environment.
Mar 4, 2010
Tip: How To Remove Office 2007 if you can't Uninstall
On older versions of office we could use the Windows Installer Cleanup Utility to remove failed Office installations.


but Office 2007/2010 is not supported by this tool and using it can cause nothing but trouble.
Instead, there are a few other methods to remove Office 2007 or Office 2010 if the regular uninstall procedure fails.
1. The Microsoft Manual Removal Instructions:
follow Microsoft's step-by-step guide to remove any trace of office in the registry and file-system.
Article source: http://support.microsoft.com/kb/928218
2. Office 2007 Registry Cleanup Tool: download the tool from here.
3. Suffer's Office 2007 Uninstaller Tool: download the tool from here.
The tool strip out Microsoft Office 2007 when the standard uninstall process wont work
Oct 12, 2009
Fix: How To Remove Office Genuine Notification (OGA Update)
Office Genuine Advantage (OGA) is another initiative by Microsoft to stem the piracy and counterfeit copy of Microsoft Office business producitivity suite and applications. Since April 15, 2008,Office Genuine Advantage (OGA) Notifications was pushed to client computers installed with Microsoft Office XP, Office 2003 or Office 2007 as “Important” or “Needed” update, and is not removable or uninstallable after installed.
After installed, OGA validation component will perform a check on install Office software, and OGA Notifications notifier component will display various “This copy of Microsoft Office is not genuine” message if the Office software is determined as not genuine or not legitimate.
After installed, OGA validation component will perform a check on install Office software, and OGA Notifications notifier component will display various “This copy of Microsoft Office is not genuine” message if the Office software is determined as not genuine or not legitimate.
Although officially Microsoft prevents and disallows end-users from removing OGA Notifications (KB949810), there are several workarounds or hacks to remove Office Genuine Advantage Notifications. In fact, as it’s a MSI (Windows Installer) package which installed the OGA, the KB949810 OGA update can be removed and completely uninstalled properly and completely by using MSI uninstall string.
How to Uninstall Office Genuine Advantage Notifications (KB949810)
Open an command prompt window with elevated privileges.
Depending on the version of OGA (Office Genuine Advantage) installed (can be view from properties of %SystemDrive%\Windows\System32\OGAAddin.dll or DEL %SystemDrive%\Windows\System32\OGACheckControl.dll), run following commands below (see Tip below if you only want to run one command):
MsiExec /X {049F2E8F-D5EC-4133-87FA-8E94837D8D0C} /QN /NORESTART ALLUSERS=1
MsiExec /X {B148AB4B-C8FA-474B-B981-F2943C5B5BCD} /QN /NORESTART ALLUSERS=1
MsiExec /X {DB427EF6-F13E-4AA6-9D40-5D962394774F} /QN /NORESTART ALLUSERS=1
MsiExec /X {B2544A03-10D0-4E5E-BA69-0362FFC20D18} /QN /NORESTART ALLUSERS=1
MsiExec /X {B148AB4B-C8FA-474B-B981-F2943C5B5BCD} /QN /NORESTART ALLUSERS=1
MsiExec /X {DB427EF6-F13E-4AA6-9D40-5D962394774F} /QN /NORESTART ALLUSERS=1
MsiExec /X {B2544A03-10D0-4E5E-BA69-0362FFC20D18} /QN /NORESTART ALLUSERS=1
Note that the GUID identifier for OGA application may vary from system to system, depending on version and language installed. Generally, it works for OGA v1.7.0102.0, OGA v1.7.0105.35.0 and OGA v1.7.0105.35.0 v2.0.48.0.
Tip: To determine which is the exact application ID for Office Genuine Advantage installed on your system, run registry Editor (RegEdit), and navigate to the following registry key:
HKEY_LOCAL_MACHINE\SOFTWARE\Microsoft\Windows\CurentVersion\Uninstall
There are many registry sub-keys that resembles the product ID above. Go into each and everyone of the registry sub-branches to look for and locate DisplayName REG_SZ value data which matches or similar toOffice Genuine Advantage or OGA.
After uninstalling OGA properly, it’s wise to clean up and remove all trace of OGA from the system. Run the following commands to delete all registry entries and system files, if still present:
REG DELETE HKEY_LOCAL_MACHINE\SOFTWARE\Microsoft\Office\Word\Addins\OGAAddin.Connect /f
REG DELETE HKEY_LOCAL_MACHINE\SOFTWARE\Microsoft\Office\Excel\Addins\OGAAddin.Connect /f
REG DELETE HKEY_LOCAL_MACHINE\SOFTWARE\Microsoft\Office\Powerpoint\Addins\OGAAddin.Connect /f
REG DELETE HKEY_LOCAL_MACHINE\SOFTWARE\Microsoft\Office\Outlook\Addins\OGAAddin.Connect /f
DEL %SystemDrive%\Windows\System32\OGAVerify.exe
DEL %SystemDrive%\Windows\System32\OGAEXEC.exe
DEL %SystemDrive%\Windows\System32\OGAAddin.dll
DEL %SystemDrive%\Windows\System32\OGACheckControl.dll
User who want an automated solution to remove Office Genuine Advantage can download the OGA Uninstaller, a batch script that automatically run all of above commands.
Download this batch file
Tool: Easily Diagnosing Bios Beep Codes

This test is run by the motherboard. Hardware devices such as memory, PCI, AGP and more are being checked. the BIOS system is also checked for normal functionality.
in case of an error, the result is heard as a set of beeps in different frequencies (like Morse codes).
the beeps differs between different Bios manufacturers.
To understand the meaning of the beeps you can read the following sites:
or use this nice tool that sums it all in one place:
Download: Beeping Bios Codes Tool
Some more helpful information about Bios can be found in these guides:


Aug 25, 2009
Monitoring Tools for Checking CPU and System Temperatures
Today's PCs comes with many built-in sensors for checking the temperature inside the device.
Such sensors reside in the system's CPU, Motherboard, Graphic Card (GPU), Hard-Disk and more.
I'll list some useful tools I'm using for monitoring the system temperatures.
1. Speedfan
Features:
License: Freeware
YaronMaor Rating: 5/5 *****
2. HWMonitor

Features:
Tips:
Check the Maximum temperature values column to see the peak values since last boot.
Export the results to a text file (.txt) using the File menu.
License: Freeware. Has an extended paid version called HWMonitor Pro
3. CoreTemp
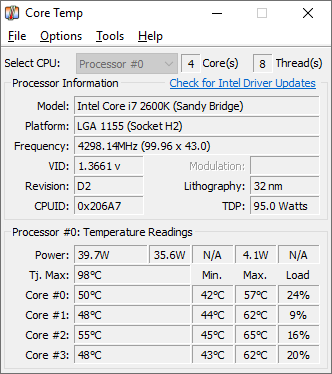
Features:
Tips:
4. NextSensor
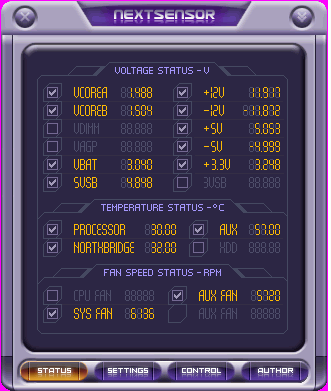
Features:
Temperature & Voltage monitoring.
Control for fan speeds
Advanced GUI with support for seperate icon on the system tray for each sensor.
Tips:
Set the sensors you want to monitor and run minimized while enjoying up to three dynamic notification icons for each sensor.
5. SensorView

Such sensors reside in the system's CPU, Motherboard, Graphic Card (GPU), Hard-Disk and more.
I'll list some useful tools I'm using for monitoring the system temperatures.
1. Speedfan
Features:
- Temperature monitoring
- Fan Speed Control
- Voltage Reading
- Hard-Disk SMART Checking
- Event-Notification including Popup & E-mail alerting
- Supports 32/64bit
Tips:
- Use the /s switch to do a silent install for mass-deployment.
- On warm systems set the min/max fan speed to 100% so that the fan would be in full-speed all the time.
- Use the options to "Start Minimize" and "Minimize on Close", than copy the Speedfan shortcut to the Start Menu Startup folder.
- Make sure you choose the relevant temperature sensor to be shown on the system tray.
License: Freeware
YaronMaor Rating: 5/5 *****
2. HWMonitor
Features:
- Reads the CPU Temperatures only but seperates the results for each CPU-Core.
- Identify the running hardware make and model (i.e. which CPU, which Graphic Card...)
- Portable (single EXE file that runs without installation)
Tips:
Check the Maximum temperature values column to see the peak values since last boot.
Export the results to a text file (.txt) using the File menu.
License: Freeware. Has an extended paid version called HWMonitor Pro
YaronMaor Rating: 3/5 ***
You can't control the fan speeds... I'm missing some background-monitoring functionality.
3. CoreTemp
Features:
- Reads Temperatures, Voltage and fan Speeds
- Portable (single EXE file that runs without installation)
- Fully Supports XP/Vista/Windows7 32bit & 64bit
- Can run in the background for monitoring & alerting
Tips:
Set the Overheat Protection parameters for alerting while running in the background.
Use the Screenshot option in the Tools menu to save a picture file of the current window.
Supports Add-Ons to extend functionality
Developers can use a shared-library to communicate with the program
License: Freeware.
YaronMaor Rating: 3/5 ***
You can only see the CPU temp...
4. NextSensor
Features:
Temperature & Voltage monitoring.
Control for fan speeds
Advanced GUI with support for seperate icon on the system tray for each sensor.
Tips:
Set the sensors you want to monitor and run minimized while enjoying up to three dynamic notification icons for each sensor.
License: Freeware.
YaronMaor Rating: 2/5 **
Too graphically advanced so the functionality and quick-learning of use gets damaged...
5. SensorView
Features:
- Notification at critical values.
- You can set a threshold of concern and correction.
- Sending email.
- Graphs.
- Showing chosen parameter in the tray.
- Showing CPU usage.
- Showing physical memory usage.
- Showing HDD usage.
- Showing NIC usage.
- Log file for events and warning messages
License: Shareware. 19.95$-24.95$ (Used to be free until Dec/2005)
YaronMaor Rating: 3/5 ***
Not portable, Not freeware/Not Cheap...
Conclusion:
If I could get the functionality of Speedfan in a portable version with the development toolkit of CoreTemp it would have been the best.
One important feature I haven't yet found is the ability to run as a system-service for Windows-Servers and 24*7 running PC's.
I usually install Speedfan for permanent solution and use HWMonitor for quick glance using my USB-Disk.
Do you know any other tool that's worth checking? comment me and I'd be happy to share a review.
Cheers,
Yaron Maor
Aug 5, 2009
How To Debug BSOD Blue Screen Errors using BlueScreenView Utility
A new tool from the home of Nirsoft has come to the rescue.
Using BlueScreenView, a small portable debugging tool, you can easily find information regarding your previous Stop errors (also known as Blue Screen of Death).
The tool uses the saved memory dump files that Windows saves in the folder C:\Windows\MiniDump\
After running the tool you'll see a table listing each memory dump info including: date & time of crash, the Error Code and parameters and most important- the suspected driver/cause of the crash.
One small extra is the ability to change the detail view into a Blue-Screen simulation screen that shows you how the error message approximately looked like:
Why using this tool instead of the Windows Debugging Tools Pack from Microsoft?
1. it doesn't need another installation of external software.
2. it does a batch debug of all mini-dump files altogether instead of one-by-one using WinDbg.
3. it runs directly from your USB :)
Have fun!
YaronM
Jun 12, 2009
How to Uninstall & Remove Applications The Easy Way
Problem
There are some cases where just using the Control Panel's Add/Remove Programs applet is not enough:
Resolution
For cases like these we have some cool tools to deal with.
1. The PC Decrapifier:
The PC Decrapifier is designed to remove a specific list unwanted software in an unattended fashion. it will clean you brand new OEM laptop from all it's crapware that came pre-installed from the vendor.
2. AppRemover:
AppRemover enables you to thoroughly uninstall security applications such as antivirus and antispyware from your computer. especially those that won't uninstall nicely.
3. Revo Uninstaller:
Revo Uninstaller helps you to uninstall software and remove unwanted programs installed on your computer even if you have problems uninstalling and cannot uninstall them from "Windows Add or Remove Programs" control panel applet.
Revo Uninstaller is a much faster and more powerful alternative to "Windows Add or Remove Programs" applet!
4. CCleaner
To complete the cleanup process we will use the great CCleaner utility.
CCleaner is a freeware system optimization, privacy and cleaning tool. It removes unused files from your system - allowing Windows to run faster and freeing up valuable hard disk space. It also cleans traces of your online activities such as your Internet history. Additionally it contains a fully featured registry cleaner.
xfsu3py9n8
There are some cases where just using the Control Panel's Add/Remove Programs applet is not enough:
- When you buy a new OEM Desktop PC or Laptop it comes with loads of crap software inside it. that includes Office and Antivirus Trial versions, Freewares like Java, Picasa and more.
- When you try to uninstall a software using it's uninstaller and it just breaks in the middle with an error.
- When you need a password to uninstall a security application like many Corporate Antiviruses.
Resolution
For cases like these we have some cool tools to deal with.
1. The PC Decrapifier:
The PC Decrapifier is designed to remove a specific list unwanted software in an unattended fashion. it will clean you brand new OEM laptop from all it's crapware that came pre-installed from the vendor.
2. AppRemover:
AppRemover enables you to thoroughly uninstall security applications such as antivirus and antispyware from your computer. especially those that won't uninstall nicely.
3. Revo Uninstaller:
Revo Uninstaller helps you to uninstall software and remove unwanted programs installed on your computer even if you have problems uninstalling and cannot uninstall them from "Windows Add or Remove Programs" control panel applet.
Revo Uninstaller is a much faster and more powerful alternative to "Windows Add or Remove Programs" applet!
4. CCleaner
To complete the cleanup process we will use the great CCleaner utility.
CCleaner is a freeware system optimization, privacy and cleaning tool. It removes unused files from your system - allowing Windows to run faster and freeing up valuable hard disk space. It also cleans traces of your online activities such as your Internet history. Additionally it contains a fully featured registry cleaner.
xfsu3py9n8
Jun 4, 2009
Fix: Unable to Show Hidden Files and Folders in Folder Options
There are some viruses that prevents you from settings the Folder Options to Show Hidden Files and Folders.
The virus use this block as a protection to hide its files and prevents the healing process.
When you try to set the Show Hidden Files and Folders to Enabled it reverts back to Disabled after you click on OK. Sometimes you don't even have access to the Folder Options settings at all.
There are several ways to fix this problem. It depends on the complexity of the virus:
1. Use the tool DiskHeal from Computer-Realm to bypass the blocked Show Hidden Files and Folders.
install the tool and run it. on the Fix Menu click on the button "Fix Folder Options inaccessibility".
2. Using Safe-Mode and Login as a different Administrator Account
Most viruses does the blocking by using Windows own Local Group Policy. the policy is applied on the Current User Account and only on some cases on the Local Machine. Therefore by login-in as a different Administrator user you can bypass the block. Using Safe-Mode as a trouble-shooting environments is also wise because most group policy rules are not working in that mode.
you can also do a Virus Scan on Malware scan during the Safe-Mode session.
3. Cleanup using an external Boot CD
You can use one of those custom Mini-XP boot CD's or Microsoft's ERD Commander to get access to the system's Registry, Autorun settings and file system. Than you could delete the problematic virus files, either manually or using an anti-virus scanner. One of my favorites boot CD's is the Hiren's BootCD. the latest 9.8 version includes a custom Mini-XP that runs from your CD and gives you a great Explorer shell to troubleshoot Windows. you can download Hiren's BootCD using this Torrent.
May 31, 2009
Fix: Use ScanPst.exe of ScanOst.exe to Fix Damaged Outlook Personal Folder Data Files
The Data Files
Microsoft Outlook uses two types of data files as storage:
In Windows XP:
C:\Documents and Settings\%UserProfile%\Local Settings\Application Data\Microsoft\Outlook
In Windows Vista:
C:\Users\%UserProfile%\AppData\Local\Microsoft\Outlook
A data file usually gets damaged due to crashing of Outlook or exceeding the logical size limit of the file format. PST files that were created on Outlook versions 2000-2002 are limited to 2GB of size. Still, it usually gets crappy after 1.5GB. Later versions of Outlook can created upto 20GB of PST without (theoretically...) get stuck.
The Symptoms/Error Messages:
When the file gets damaged, you get several error while trying to run Outlook:


The Tools
We use two tools provided by Microsoft to deal with PST/OST problems:
SCANPST: used for the error scanning and fixing of PST and OST on some cases.
SCANOST: used for scanning and fixing of OST while connecting to the Exchange server.
the tools are located in the following path, depanding on your Office version:
Office 2002-2003
C:\Program Files\Common Files\System\MSMAPI\1033
* the number in the end can vary according to your Office setup localization.
Office 2007
C:\Program Files\Microsoft Office\Office12
After running the tool, you need to select the data file for scanning. You can use the Browse button for easy navigation. the first scan might take some time to complete. the tool might seem as "not responding". I suggest you leave it running until it finishes without interapting (it's not the most stable tool I've used). after the scan finishes it suggest you to backup the file and then fix the problem. you can skip the backup if you wish, it usually don't make any additional problems.
When the scan finishes you can try running Outlook and see if it opens normally.
On some cases I needed to re-run the scan&fix process a couple of times and every time it found some more problems.
Demo
You can watch a video demo from MS on using the tool: Watch Demo
If you're having any other problem or have any questions, post it on the comments.
Microsoft Outlook uses two types of data files as storage:
- *.PST : Used as a local Personal Folders or Archive Folders.
- *.OST: Used as a local cache of an Exchange Mailbox.
In Windows XP:
C:\Documents and Settings\%UserProfile%\Local Settings\Application Data\Microsoft\Outlook
In Windows Vista:
C:\Users\%UserProfile%\AppData\Local\Microsoft\Outlook
A data file usually gets damaged due to crashing of Outlook or exceeding the logical size limit of the file format. PST files that were created on Outlook versions 2000-2002 are limited to 2GB of size. Still, it usually gets crappy after 1.5GB. Later versions of Outlook can created upto 20GB of PST without (theoretically...) get stuck.
The Symptoms/Error Messages:
When the file gets damaged, you get several error while trying to run Outlook:
The Tools
We use two tools provided by Microsoft to deal with PST/OST problems:
SCANPST: used for the error scanning and fixing of PST and OST on some cases.
SCANOST: used for scanning and fixing of OST while connecting to the Exchange server.
the tools are located in the following path, depanding on your Office version:
Office 2002-2003
C:\Program Files\Common Files\System\MSMAPI\1033
* the number in the end can vary according to your Office setup localization.
Office 2007
C:\Program Files\Microsoft Office\Office12
After running the tool, you need to select the data file for scanning. You can use the Browse button for easy navigation. the first scan might take some time to complete. the tool might seem as "not responding". I suggest you leave it running until it finishes without interapting (it's not the most stable tool I've used). after the scan finishes it suggest you to backup the file and then fix the problem. you can skip the backup if you wish, it usually don't make any additional problems.
When the scan finishes you can try running Outlook and see if it opens normally.
On some cases I needed to re-run the scan&fix process a couple of times and every time it found some more problems.
Demo
You can watch a video demo from MS on using the tool: Watch Demo
If you're having any other problem or have any questions, post it on the comments.
May 21, 2009
Tools: View Passwords, Serials, Product Keys and AutoComplete Data
Here's a list of some useful tools I'm using the backup your private data:
View Hidden or Saved Passwords:
Mail Account Passwords - Mailpv , Outlook Personal Folder Passwords
Dialup & VPN Passwords - Dialupass
Wireless Network Passwords- WirelessKeyView
Browser Passwords - Internet Explorer, Firefox , Chrome , NetScape, IE Content Advisor
Messenger & ICQ- mspass
Network Passwords - netpass
Licenses, Product Keys & Serials: ProduKey, KeyFinder153, KeyFinder2, LicenseCrawler
Asterisks (***) hidden passwords: Asterisk Logger, AsterWin, ShowPwd, UnMask, Revealer, Asterisk Key, Password Unleasher, KernelPasswordUnmask
Browser (IE) hidden passwords: AsterWinIE, IEpassview , IEAstRecover
Windows Mobile Hidden passwords: PocketAsterisk
Application specific passwords: VNC, PCanywhere, Win95-98, Remote Desktop, MS-Access, SQL Enterprise Manager , AspNetUserPass
You can also use my self-assembled script to auto-save your data: SaveMyData2
Many thanks and credit goes to the lovely site NirSoft.Net
Fix: Network, Internet, Winsock, TCP/IP Connectivity issues in Windows XP & Vista
Network connectivity issues can be complex to troubleshoot.
I will try to list my troubleshoot guide for basic connectivity issues:
1. Physical Connectivity:
Although it is obvious, on most times people only check it last...
go through all your networking gear: from the jack on the wall to the Network RJ45 on your PC.
- Release & reconnect all the cables from the all to the network equipment and your computer.
- if connected to ADSL, make sure you have a Phone-Filter on all your phone-jacks using the same line.
- if you use a modem, check it is Sync'ed (ADSL/Cable Link LED is On & Steady)
- try restarting your Router, Hub/Switch. sometimes there's more then one device forming the network. for
example, a router & a modem on one floor and another switch & Wireless AP on a second floor.
- check to see if you have LED lights on the Network-Card on your PC and on the Network device.
- make sure the network cables are firmly attached and have their safety-latch intact.
2. Resetting your TCP/IP, WinSock & Network Card Settings
Windows uses protocols, drivers & software to operate the network magic. we need to make sure everything is setup correctly and not broken.
- Reset the TCP/IP Protocol:
In Windows XP SP2 and above (Including Vista) we can use this command: netsh int ip reset log.txt
- Reset the WinSock:
In Windows XP SP2 and above (Including Vista) we can use this command: netsh winsock reset
- Tools: On older versions of Windows we can use some tools to help us to the fix: WinsockFix , NetRepair
- Reset the Network Card:
a. Make sure your TCP/IP settings are correct:
Control Panel>Network Connection>Local Area Connection>R-click and Properties>Internet
Protocol TCP/IP Properties > make sure the IP address and DNS settings are set to Automatically or
Manually according to your network setup. if you're not sure you can always write down the current
setup, try the opposite and later undo the changes it's not working.
While you're there, make sure you have all the networking component setup. for most Microsoft-Based
Networks you should see (at least) 3 components:
Client for Microsoft Networks, File and Printer Sharing Service, Internet Protocol TCP/IP
b. Try repairing the connection by: Control Panel>Network Connection>Local Area Connection>r-click
and choose Repair. the Repair process is equal to Releasing & Renewing the IP and clearing the DNS &
ARP cache. you can also to it manually from the CMD is your wish to make it manually:
CMD> ipconfig /release
CMD> ipconfig /renew
CMD> ipconfig /flushdns
c. Try Uninstalling/Reinstalling the network device from Device Manager
(r-click My Computer>Manage) the plug & play process makes it quick and easy and the result is a
network card that resets to defaults settings.
If nothing works...
Try having another PC/Laptop connect to the same cable and see if it works
Try temporarily-disabling and Firewall, Antivirus, VPN/Proxy Software running.
Check your connectivity with different software (maybe the IE is broken but Skype works fine...)
Of course there are many more things to check but these are the most important basics you need to know.
I haven't even written about nothing regarding Ping, Tracert, localhost, host file and many other useful information, but these will probably come in a later post :)
May 8, 2009
Vista SP2 doesn't have the TCP/IP Half-Open Connection Limit!
After years of struggle with Tcp/Ip patches, Microsoft finally remove the half-open connection limit.
Since Windows XP SP2 Microsoft limited the maximum half-open connections to 10 only. this limitation have caused many file-sharing applications to slow-down their download rate, and Event-id 4226 has flooded the system event log.
In Vista SP2 this limitation is finally gone! you can read more about it in this KB969710 Article
If you still wish to keep the limitation running (for any reason I can't even think of..) then use this registry tweak:
Those of you who still works on older versions of Windows (Vista/SP1, XP-SP2/SP3) can use this Universal TCP/IP Patcher from Deepxw. Another fine patcher from Half-Open.com
UPDATE: The same as Vista SP2 update, so does Windows 7 not having the limit for the half-open connections.
Since Windows XP SP2 Microsoft limited the maximum half-open connections to 10 only. this limitation have caused many file-sharing applications to slow-down their download rate, and Event-id 4226 has flooded the system event log.
In Vista SP2 this limitation is finally gone! you can read more about it in this KB969710 Article
If you still wish to keep the limitation running (for any reason I can't even think of..) then use this registry tweak:
- Locate and then double-click the following registry key:
HKEY_LOCAL_MACHINE\SYSTEM\CurrentControlSet\Services\Tcpip\Parameters\EnableConnectionRateLimiting - In the Value data box, type 1, and then click OK.
- Exit Registry Editor.
- Restart the computer.
Those of you who still works on older versions of Windows (Vista/SP1, XP-SP2/SP3) can use this Universal TCP/IP Patcher from Deepxw. Another fine patcher from Half-Open.com
UPDATE: The same as Vista SP2 update, so does Windows 7 not having the limit for the half-open connections.
Subscribe to:
Posts (Atom)